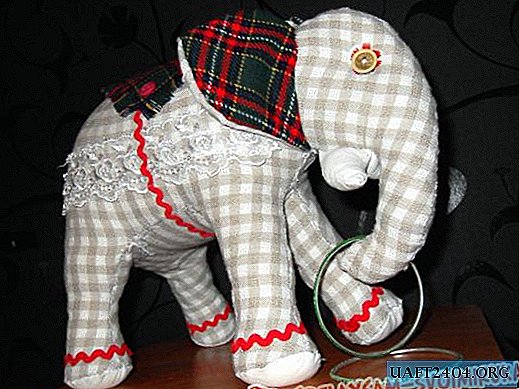
Such an elephant can be sewn independently for your child. As a gift to a loved one or in order to put it in your home as a vintage, exclusive and very cozy element of decor. For manufacturing, you will need very few improvised materials and about two to three hours of free time. You do not need to have special knowledge, it’s enough to at least be a little able to sew and effectively use your own imagination. After all, the more you show it, the more interesting the result will be.
So, prepare the tools for the job:
1. Scissors
2. The needle
3. Thread
4. pen
5. Paper or plastic film to draw a pattern

Find unnecessary scraps of fabric, buttons, lace, a variety of ribbons, braid, beads, beads can come in handy. Not all of this is necessary, only what you have at home. Old clothes are perfect, which is not a pity to use for the sake of such a creative thing. But it is easy to find buttons on it, and all of the above. Absolutely choose the color of the fabric to your liking or to your interior. The most effective will look like a multi-colored elephant in a small flower, in a cage or strip. In general - the choice is yours.
You will also need a patch of white or any other plain fabric for the tusks of an elephant and absolutely any other, preferably contrasting, for the inside of the ears and decoration of the toy. For stuffing, use a synthetic winterizer, if the toy is intended for the baby, or cotton wool, rag trimmings, then the elephant will not be so soft, heavier and more stable, which is preferable for use for decorative purposes. If you want to add extra rigidity, use a wire frame for the entire figure or just for the legs.

The manufacturing process begins with a pattern. You can use the finished one or come up with your own. It is important that the product is not too small. In fact, the smaller the craft, the longer it will take to tinker with it because of the small details and the scrupulousness of working with them.

Draw a pattern on paper or plastic film and cut with scissors.

Transfer each part to the fabric, while if the right and left sides are provided, do not forget to turn the pattern over so as not to get non-paired elements.
1. The body (on the pattern it is divided into two parts, you need to combine) - 2 details
2. Head with trunk (can be cut separately or together with the body by cutting openings for the ears at the junction) - 2 parts
3. The inner part of the hind leg - 2 parts
4. The inner part of the front leg - 2 parts
5. Belly - 1 item
6. Foot - 4 parts
7. Tail - 1 part
8. Ear - 4 parts

When all the elements are drawn on the fabric, you can cut. At the same time, it is advisable to retreat slightly from the edge of the pattern in order to leave an allowance for seams.

Stitch the details - two halves of the body with the head, to which the inner parts of the legs are initially attached, feet are sewn to the legs, then the belly, one side of which is not sutured, so that there is a hole for stuffing.

Do not forget about the ears, tail and tusks - they are already ready to be put face-first inwards in the right places and fixed during the stitching of the entire product.

The rag skin of an elephant eversed. Now it remains to fill it tightly through the hole in the belly and sew it up.

The most interesting part of the work begins - decoration. Buttons will serve as excellent eyes for the elephant. And one could stop on this - the child would be happy already with such a result.

But we go further - we sew an openwork patch on the back of an elephant from the same fabric that he has on his ears, decorate it with buttons, decorate the elephant’s legs and sides with braid, add lace. In general, we create beauty from what is and who knows how. The main thing is a sense of proportion and an aesthetic sense to get one such or even better elephant made by one’s own hands.

