Share
Pin
Tweet
Send
Share
Send


The main materials that can not be dispensed with are:
- Rigid cardboard (for example, packaging from blankets, curtains)
- Fabrics in various colors and textures
- Ribbons, ruffles, guipure
- Foamiran
- Beads, rings
- Foam rubber or synthetic winterizer
- Threads with a needle, glue gun.

The book will have 4 pages, and the inside can immediately be covered with a cloth, such as a flannel.
It is not necessary to sew fabric - it can be fixed on glue. It will turn out faster and without seams.

For softness, the covers of the book are first glued only with synthetic winterizer. We will do the cladding at the end of the work.

We glue the inner surface of the cover with a colored cloth. Sew along the perimeter.

Now the most interesting thing is the interior of the first room. This is a living room, and it will have a sofa, TV and a large window.
1. The window. From white foamiran we cut a rectangle of 5 * 12 cm, from gray - 3 thin strips of 5 * 0.3 cm. To decorate the curtains, we prepare a rectangle of guipure fabric (tulle), and 2 rectangles of dense fabric (curtains).


2. TV. From black foamiran we cut out a rectangle of 5 * 10 cm and legs of arbitrary shape. We prepare a screen-picture of a suitable size.

3. The sofa. Rectangular blanks made of woolen fabric, rectangles made of cardboard (for the back and seats), a synthetic winterizer for stuffing the sofa are needed.

Let's make the sofa voluminous. To do this, we lay the synthetic winterizer on cardboard, we tighten the fabric on top, fixing it with a glue gun.
In general, all the details of the house are miniature, so there is no need to draw patterns and measure something with a centimeter tape. In our case, everything is done “by eye”, and the glue gun will perfectly hide all errors.

We make the side backs of the sofa from rectangles of fabric, synthetic winterizer and circles of dense brown fabric. Sew the rectangle along the length, fill it with a synthetic winterizer (foam rubber) and seal it with a circle of brown fabric, also sewing it in a circle.

We assemble the sofa immediately in place - first we glue the seat, then the back and sides.
When the book is closed, the back of the sofa will lean back, and when opened, it will straighten.

Glue the rest of the details to the first page - a TV, a window with curtains. You can make paintings from foamiran and hang them on the sides of the window. We put a pot of plants near the sofa. The pot is simply cut out of fabric or leatherette and glued. And we embroider the plant with green thread floss.

We make a chandelier in the same way - cut out a hemisphere from the material, glue it, and fasten a guipure ribbon along the lower edge.
There is a rug in front of the sofa. It can be cut from a suitable material, or it can be knitted.
We proceed to the second room - the bedroom. It will accommodate a bed, chest of drawers, wardrobe.
1. The bed. We prepare a square from cardboard, fabric, synthetic winterizer. For a blanket - a square of fabric and synthetic winterizer, as well as a rhombus to simulate a duvet cover. For a pillow - a synthetic winterizer, lace and fabric of any shape.

We make the bed itself similar to a sofa - we tighten cardboard with a cloth, placing a synthetic winterizer between them. Cloth with adhesive. Sew the quilt with threads, sew a diamond of colored fabric, and attach lace lace along the contour. We also make the pillow soft, decorate with lace.

2. Wardrobe. 2 blanks of cardboard and leatherette for doors are needed. Another 1 square of leatherette will go for the interior arrangement of the cabinet.

We tighten the cardboard doors with material, glue all the edges.
From a cotton swab we make a bar for hangers. Hangers can be made from paper clips by folding them with pliers in an appropriate manner.

Glue a piece of dense foil on one of the doors, imitating a mirror.

3. Dresser. Glue the rectangle from the fabric to the background. We embroider boxes and handles on the dresser with thread.

We glue all the interior details.
We lay a knitted mat near the bed.

We will build a bathroom. Here you can put a bath, a washing machine and all kinds of shelves with bath accessories.
1. Bath. On the foamiran, we first draw a bath, and then cut it out. Also cut the legs of the bath. From a blue cloth we cut a small piece for the curtain.

2. The washing machine. From foam rubber or thick foamiran, cut a square and make a hole in the center. We also cut out the door of the washing machine of the corresponding size and buttons.

3. Shelves for the bathroom are built from the same foamiran. We hang towels and a bathrobe for dolls on hooks (diamonds from foamiran).

We arrange the bath by gluing all the parts in the right order. We put the curtain on the fishing line. Sew the ends of the fishing line for the greatest reliability.
We embroider the shower and taps in the bathroom with mouline thread.

The fourth room is the kitchen. We place here a refrigerator, a dining table with chairs, a gas stove, cabinets and a window.
1. The refrigerator. All details are cut out of foamiran. We choose an arbitrary form. We will make inner shelves from foamiran strips, the ends of which will be glued, and the center is free.
From the same material you can cut out the contents of the refrigerator - fruits, pots, jars.

We glue the details of the refrigerator. Doors, glue only on one edge so that they open and close.

2. Table and chairs. On the fabric, draw the shape of the chairs, cut out. For the table we will prepare a square of cardboard and colored material.

We tighten the cardboard with a colored cloth and fix with glue, glue a lace braid around the perimeter.
In order to make the table more voluminous and not “lie on the floor”, we lay 2 more layers of cardboard under it and, gluing all the layers, glue the table to the floor. On both sides of the table we fix the chairs, also with glue.

3. Gas stove. We cut out a rectangle from white foamiran, make the oven door and levers of black foamiran.
Next to the stove will be a kitchen cabinet. We will make it from the same material.

4. The window and window sill are the same as the previous window for the living room and the wardrobe for the bedroom.

Inside the window sill, shelves are built in the form of pockets where you can put various objects in the future.

Next, arrange the toilet. In this room there will be a toilet bowl, bucket, wash basin, mirror, shelves.
1. Toilet bowl and washbasin. On a white foamiran, first draw a toilet bowl, then cut it out, cut the lid and drain tank separately. We also draw and cut out the washbasin and faucet.

Cut parts can be immediately glued to the background.
2. The mirror. Everyone in the house has a mirror from an old powder box or rouge. For the frame we apply a mirror to the foamiran, circle and cut along the line 2 mm larger than the drawn one. In the center of the circle also cut out the circle. We will need the resulting ring.
We glue the mirror over the washbasin, put a ring on top, and glue it. We hang 2 square napkins next to the mirror.

3. Shelf with accessories. From leatherette, cut a rectangle. You can flash pockets on it. From foamiran we cut out tubes and jars of arbitrary shape.

You can build a toilet roll, a chandelier, a fake window. We master all accessories according to the principle already described.
The last room is the entrance hall. We put here a sofa, chest of drawers and a wardrobe.
1. Dresser. From a dense fabric we will prepare a rectangle, from a dark leatherette - strips 2-3 mm wide.
On the chest of drawers there will be a vase (we will also make it from leatherette or fabric) and a telephone (we draw 3 details on the foamiran - a trapezoid, a tube and a white circle).

We glue all the blanks: first the chest of drawers; glue strips around its perimeter and along the contour of the boxes; fasten the vase and the phone.

2. Wardrobe. We make it as well as the bedroom wardrobe - from cardboard and fabric.
Next to the closet we place the front door.

3. The sofa. It can be done on the principle of a living room sofa, or you can make backs and sides from foamiran. They will also lie down when the book is closed, and when opened, they will rise.

We put mats in front of the door and sofa. From black leatherette, you can cut boots and stick them to the inner wall of the cabinet or just near the door.
Furnishing of the apartment is completed.
We proceed to facing the house. From the colored fabric, cut off the rectangle corresponding to the size of the outer surface of the book. Glue the fabric to the covers, pulling it and turning the edges inward. At the fold, the fabric is additionally stitched.

We attach ribbons to the first and last page - they will be tied and hold the book assembled.

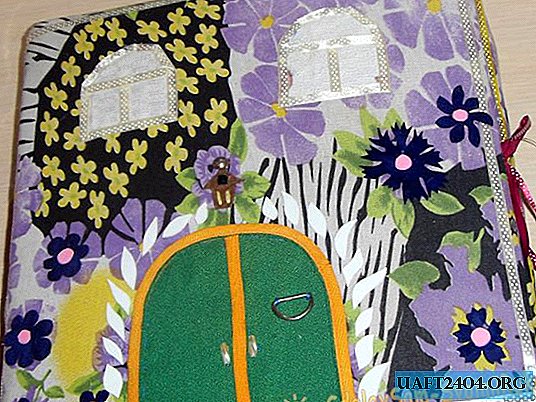
Let's make a face of the house. We put on a glue a door cut out of plain fabric. It can be square or semicircular. Sew dense braid and bead handles along the contour.

We place 2 windows above the door. They are also glued along the contour with a colored ribbon.

You can hang a flashlight near the door. We make it from brown fabric, and simulate the light emanating from it with yellow threads.
It remains to hide all the seams and errors of the house. To do this, stock up on a large number of ribbons 5 mm wide and glue them around the entire contour of the house, around the perimeter of each room, on the fold lines of the book, both outside and inside.

On the last page - the cover we will make a balcony. We select a plain fabric for it, so that the structure does not merge with the background. A rectangular piece of fabric with adhesive in the form of a pocket so that the doll can be put into it. We design window openings, contours and curtains on the balcony as desired.

The house-book is ready! This craft will be a gorgeous gift for your beloved daughter, just do not forget to put a doll of a suitable size in the house.
Share
Pin
Tweet
Send
Share
Send