Share
Pin
Tweet
Send
Share
Send

Necessary materials:
- lids for canning - 20 pcs.;
- hairpin M8 - 50 cm;
- M8 nuts and washers;
- Wi-Fi adapter;
- coaxial cable with connector for adapter.

Antenna manufacturing
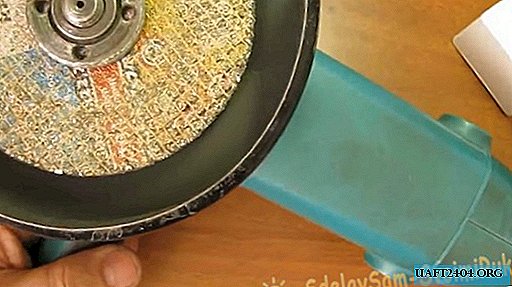
To assemble the antenna, it is necessary to cut round plates from the lids for canning. Before that, they need to find the center and drill an 8 mm hole in it to further string the plates onto the hairpin.
You can determine the center using the usual clerical ruler. It is applied to the cap so that its corners are in a circle line. Felt-tip pen draws two parallel lines along the edge of the ruler, after which the same marks are made, but with an offset of 90 degrees. As a result, on the lid you get a lattice with a square in the middle. Having drawn diagonals in it, you can mark the center for drilling. It is most convenient to mark one cover and drill them all together in a pile, which will greatly speed up the process.

Next, you need to cut the covers to the diameter corresponding to the antenna pattern. To do this, the first cover is left unchanged, the second is cut under 68 mm, the third under 50 mm, and another 17 pieces under 40 mm.

It is very important to trim exactly, so markup is done first. The circle is drawn with a pair of compasses or with a paper clip.

You can cut with ordinary stationery scissors.

In the future, the cable connection is consumed to the antenna, so at the stage of processing the disk, you need to make holes for its core. They need to be drilled 2 cm from the edge on the two largest discs. On the first diameter of 90 mm, you need to use a drill of 7 mm, on the second disk of 68 mm, a drill of 0.7 mm is used.


If an adapter for 2 antennas is used, then you need to make 2 more similar holes. They are drilled with a quarter-circle offset from the first.
Next, discs are mounted on the stud. First, 17 small ones are clamped, then 50 mm, 68 mm and 90 mm. The distance between the small segments is 22 mm. Each disc is clamped between two M8 nuts.

In front of a plate with a diameter of 50 mm, it is necessary to indent 12 mm, in front of 68 mm - 9 mm, and in front of 90 mm - 7 mm. The last elements are clamped with washers, since the nuts are much wider than the required clearance.


To use the antenna, you must connect a coaxial wire to it. To do this, you need to strip the central core a few centimeters, and then remove the top insulation by another centimeter and install part of the F-connector or another tip. After that, the wire is first inserted into the 90 mm disk. Around its opening there is a curved metal, which can be squeezed by side cutters, reliably fixing the cable.

The central core of the wire should also be crimped with metal along the rim of the hole on the 68 mm disk.


A homemade antenna is connected instead of a standard antenna to a USB Wi-Fi adapter. After that, it connects to a computer or laptop.

After that, an automatic search is performed, which shows dozens of networks, some of which can be free or open access.

Also, the antenna through the adapter can be connected to a tablet or to a laptop.


It can also be connected to a router and set up distribution.


Share
Pin
Tweet
Send
Share
Send