Share
Pin
Tweet
Send
Share
Send
Will need
You can make a tool for assembling and storing a garden hose from waste materials, while others cost a penny. We must prepare the following before starting work:
- side ring from the truck wheel;
- drive and wheel hub from a passenger car;
- spray paint in spray cans;
- square steel bar;
- fasteners (bolts, nuts, washers);
- plastic caps and polymer tape.
For the manufacture of a hose reel, we need: a grinder with a cutting disc, a hammer and a center punch, a drill with a drill, a level gauge, tape measure and marker, welding equipment, mechanical emery and pliers.
Manufacturing process
We cut the bead ring in half by means of a grinder and a cutting disc. Divide one half again into two equal parts.
Install the half of the disk vertically with the ends on a flat surface. Close to it from the inside, we put the quarters with convex sides outward, closer to one edge and symmetrically to each other.
Using a level gauge, we check the vertical position of the disk half and weld it to the quarters.

At the very top of the vertical element we weld the wheel hub from the car so that its flange is directed towards the long ends of the horizontal elements.

We fix the disk on the hub and check the ease of rotation in the hub bearing. If these two parts are from different machines, the holes may not match. Then, using the hub as a template, you need to outline and then drill new holes in the disk with a drill.


We color the assembled assembly (without a disk) from a spray can.

From square rods we cut eight pieces of equal length, the ends of which we process (round) on a mechanical emery.

On the disks on both sides, with the help of a level gauge, marker, drill and pliers, we carry out four rectangular cutouts located evenly around the circumference.

We place radially square rods in these cutouts, slightly tilted upwards, and weld in this position.

We treat the welding spots with a grinder and paint the can assembly from a spray can.

We install the disk on the hub and fix it with the help of three bolts and nuts. We wind the electrical tape at the ends of the rods and tighten the plastic caps with an interference fit.


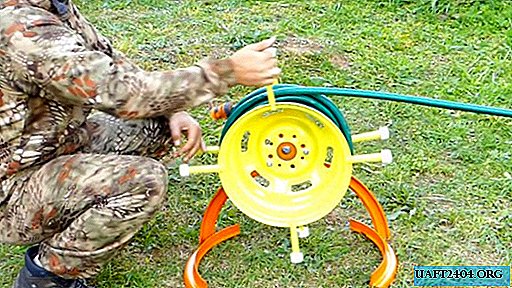
The coil is fully operational. We check it in action: we fix the end of the hose to the disc and begin to rotate it by the handle rods, which will simultaneously serve as limiters for the hose.
The winding is quite easy, because the disk rotates on the hub bearing. To unwind it, just pull the free end.


Share
Pin
Tweet
Send
Share
Send