Share
Pin
Tweet
Send
Share
Send
It will be useful to us:
- white thick paper or cardboard;
- ruler;
- a pencil;
- scissors;
- decorative cardboard or beautiful wallpaper;
- glue or double-sided tape;
- tape;
- in fact, the gift itself.
Let's get down to work. Stages of manufacturing a decorative box.
1. We will make the frame for the future boxes. Precisely size the gift. To the size of the gift add another 1 cm on each side - these will be the sides. For our gift (we gave the disk) we determined the box sizes: 12.5 cm by 12.5 cm. Adding 1 centimeter on each side, we got a square base of 14.5 * 14.5 cm.
2. Draw 4 lines above each side of the square: the distance between the square and the first line is 1.5 cm, between the first and second - 1 cm, between the second and third - 1.5 cm, between the third and fourth - 1 cm. You should get a big square.
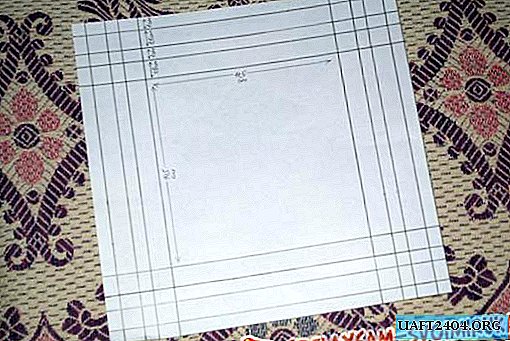
3. Trim the small squares where the drawn lines intersect. The result was a cross-shaped piece of paper. On two parallel sections, you need to make small incisions. On the first strip from the edge, trim a small triangle, on the second - a 1.5 by 1 cm rectangle, on the third - a triangle. As a result, you should get a trapezoidal neckline on two sides.

4. Bend the frame along the lines drawn with a pencil so that the edges of the cardboard bend inward.

5. Using stationery glue or double-sided stationery tape (construction tape does not work, it is too thick), connect the outer strip and the square base of the box.

Also do with all the other sides of the box.

6. From decorative cardboard or beautiful wallpaper (for example, we used non-woven wallpaper that remained after the repair), cut out a rectangle whose size can be easily calculated: the width corresponds to the width of the base, and the length is calculated by the formula - (the length of the future box * 2) + (side width * 2) = small seam allowance. We got a width of 14.5 cm, and a length of 32 cm + 1 cm per seam.

7. Glue the edges of the rectangular section.

8. Select a tape that matches the thickness and color.

9. Make a neat bow.

A box for a small wedding gift or money is ready!


Share
Pin
Tweet
Send
Share
Send

