Share
Pin
Tweet
Send
Share
Send
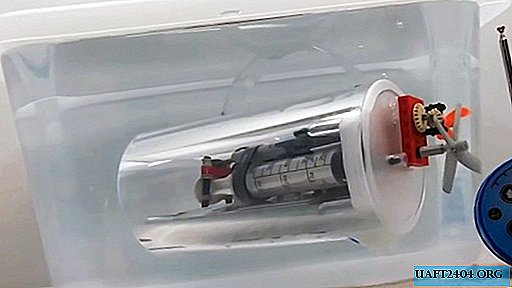
The main materials:
- plastic jug with a lid;
- 3 Lego motors;
- Lego cylinder
- syringe 60 cube;
- battery pack;
- radio control system with a remote control;
- scrap metal for balance.

Submarine assembly
First you need to make the jug waterproof. To do this, its lid is sealed with fumlent, and the spout is sealed with hot glue.


In the lid of the jug, 2 holes are made into which the shafts from two engines are discharged. For tightness they are sealed with fumlent. A large blade is attached to one motor shaft, which is responsible for horizontal movement. A Lego rotary gearbox with a small blade controlling the rotation of the boat is fixed on the shaft of the second engine. Both motors are powered through a common battery pack.


To make the mechanism of recruitment and discharge of ballast, you need to connect the retractable cylinder and the third motor together. The cylinder rod is connected to the piston of the syringe. The motor housing is secured to the syringe housing. Motor power is supplied through the same battery pack. This mechanism will be able to suck water into the syringe, thereby weighting the boat for immersion, and squeeze it out to float. In the lid of the jug, another hole is made into which the hose from the syringe is discharged.


To control the boat you need a special remote control system. It can be removed from a toy mini submarine. The control scheme used in it is designed to move forward / backward, turn left / right, set and discharge ballast water. It is better to hide the dismantled controls in an airtight box, since the hull of the boat will in any case give an easy leak. The battery pack is powered by standard Lego connectors for control. From it, wiring for three motors is already being done.


In order for the submarine to float normally, it needs to be given zero buoyancy. To do this, the jug along the edge is filled with water and weighed along with the lid. Now you need to fill the boat with ballast scrap metal so that together with the equipment it has the same mass. This will allow her not to sink, but kept herself evenly under the upper layer of water. If it is skewed, then the shipment must be redistributed over the body, compensating for the slope.


The submarine is ready. If you plan to install a camera in it, then you need to remove part of the shipment. The first tests of the underwater vehicle are best carried out by tying it with a thread to pull out in case of emergency. Periodically, the boat will have to be removed from the water and the collected water should be drained, since regular motor shafts do not allow to achieve complete tightness.


Detailed instructions in this video:
Share
Pin
Tweet
Send
Share
Send


